
Advertisements
Note: Before you start mining Pi and accumulating Pi coins, it is essential to create Pi wallet to securely store, send, and receive your digital currency. This guide will walk you through the step-by-step process of setting up your Pi wallet on the Pi Browser app.
Introduction to Pi Wallet
A Pi wallet is a digital wallet designed specifically for storing Pi, the digital currency developed by the Pi Network community. Currently, the only way to acquire Pi is through mining on your smartphone or other compatible devices. To get started with your Pi wallet, you’ll first need to create an account on the Pi Network app. If you haven’t done so already, you can download the app and sign up to begin your Pi journey. Click here for how to mine pi coin on the pi network app
How To Create Pi Wallet on the Pi browser app
Step 1: Accessing Pi Browser
Advertisements
1. Open the Pi Network mining app on your Android or iOS device.
2. Locate the side menu (☰) in the upper left-hand corner of the app.
3. Select “Pi Browser” from the menu options.
Step 2: Signing in to Pi Browser
4. Read the instructions provided on the Pi Browser page.
5. Tap the “SIGN IN TO PI BROWSER” button.
Advertisements
6. If you have already downloaded the Pi Browser app, it will automatically open and sign you in. If not, you will be redirected to the Google Play Store or App Store to download and install the Pi Browser app.
For some Android users, the link may open in the phone’s default browser. If this happens, simply open the Pi Browser app itself to proceed.
Alternatively, you can directly sign into the Pi Browser by entering “mine.pi” in the URL field and selecting “Use other sign-in methods.” Enter your Pi Network credentials to sign in.
Step 3: Generating Your Pi Wallet
7. Once you are signed in to the Pi Browser, you will be greeted with a welcome page featuring various icons. Click on the “wallet.pi” icon.
8. On the wallet page, click on “GENERATE WALLET.”
9. A unique passphrase will be generated for your wallet. It is crucial to store this passphrase securely, as it serves as the password to access your Pi coins. Copy the passphrase and save it in a secure location that is only accessible to you or someone you trust.
Note: Losing your passphrase will result in permanent loss of access to your wallet and the inability to recover your Pi coins. Keep your passphrase private and do not share it to someone you don’t trust.
Step 4: Securing Your Pi Wallet
If you did not set up biometric authentication during the wallet creation process, you may need to “UNLOCK WITH PASSPHRASE” to set up your desired biometric login method, such as fingerprint or facial recognition.
Pro Tip: Enabling biometric authentication adds an extra layer of security to your Pi wallet, ensuring that only you can access your funds.
Using Your Pi Wallet
Once you have successfully logged into your Pi wallet, you will be greeted with the Balance page, which initially contains 100 Test-Pi. It is important to note that Test-Pi is not the real Pi currency and holds no value; it is solely used for testing purposes.
How To Send Pi Coin From Your Pi Wallet
To send Pi coin from your wallet, follow these steps:
1. Switch from pi-testnet to pi mainnet
2. Tap on the “Send/Receive” button.
3. Click on “Manually Add Wallet Address“

4. Enter the recipient’s wallet address in the “Recipient Address” field. (In the future, an optional feature will allow for sending Test-Pi with usernames.)
5. Specify the amount of Test-Pi you wish to send in the “Amount” field.
Note: Like on any public blockchain, Pi Blockchain transactions are publicly visible and can be tracked on the Pi block explorer
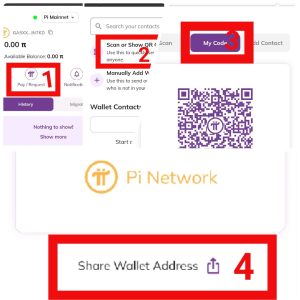
How To Receive Pi Coin – How to find your pi wallet address
To find your wallet address or receive pi coin from another pi coin holder
1. click on the “Send/Receive” button.
2. Click on “Scan or Show QR Code”
3. Select “My code” and then scroll down and click on “share wallet”
4. Choose the sharing method by which you want to send your Pi Wallet address to the sender.
Accessing Transaction History
To view your transaction history, including incoming and outgoing transactions, follow these steps:
1. Tap on the “History” link in your Pi wallet.
2. A list of all historical transactions recorded on the Pi blockchain will be displayed.
Customizing Wallet Preferences
If you wish to customize your wallet preferences, including biometric identification login solutions, follow these steps:
1. Tap on the “Settings” link in your Pi wallet.
2. Depending on your device’s capabilities, you can associate biometric login methods such as fingerprint (Android) or Touch ID/Face ID (iOS) to securely access your passphrase and log into your wallet.
3. By tapping the “SHOW” button, you can view your passphrase. Remember to keep your passphrase private and avoid sharing it with anyone.
Customizing Wallet Preferences
If you wish to customize your wallet preferences, including biometric identification login solutions, follow these steps:
1.Tap on the “Settings” link in your Pi wallet.
2. Depending on your device’s capabilities, you can associate biometric login methods such as fingerprint (Android) or Touch ID/Face ID (iOS) to securely access your passphrase and log into your wallet.
3. By tapping the “SHOW” button, you can view your passphrase. Remember to keep your passphrase private and avoid sharing it with anyone.
Note: Your wallet address is publicly visible on the blockchain, ensuring secure transactions while maintaining privacy for your wallet.
Conclusion
Congratulations! You have successfully set up your Pi wallet and are now ready to store, send, and receive Pi coins. Remember to keep your passphrase secure and take advantage of the various features within the Pi wallet to enhance the security and convenience of your digital currency transactions.
Don’t forget to explore the Pi Network community and join the conversation in the Crypto Mining Community for more updates on mining and other exciting opportunities in the world of cryptocurrencies. Start your Pi journey today and unlock the potential of this innovative digital currency!
Advertisements
5 thoughts on “How to Create Pi Wallet: A Comprehensive Guide”