Share On
Introduction
Avive has recently formed a partnership with OKX exchange for the Avive Kyc verification phase 1. In this article, we will provide you with a step-by-step guide on how to effectively complete your Avive Kyc verification phase 1 using the OKX app. By following these instructions, you will be able to seamlessly navigate through the verification process and ensure that your information is securely verified. This verification phase is an important step towards accessing the full range of benefits and features offered by Avive. So, let’s get started and make sure you successfully complete your Avive Kyc verification phase 1 using both OKX app and the Avive mining app.
Not yet mining Avive token? click here to mine Avive token today
steps to complete your Avive kyc verification phase 1
To successfully complete your Avive KYC verification phase 1, follow these steps. Register an OKX exchange account and copy your OKX UID number. Then, input your OKX UID on your Avive app. These steps will guide you through the verification process seamlessly.
step 1: Register An OKX exchange Account
To register an OKX exchange account, simply follow these steps:
1. Visit here to sign up for an OKX account
2. Enter your email address in the designated box.
3. Click on “Sign up” to proceed with your email.
4. Check your email for a six-digit code and copy it.
5. Within 10 minutes, enter the code in the “Enter code” box and click “Next.”
6. Create a strong password to secure your account, then click “Next.”
7. Congratulations! You can now access your OKX account dashboard.
Remember, you have the option to use your web browser or download the OKX app for convenient navigation.
Note: In regions where the OKX app is unavailable, please complete this form so that they can review your account and help you to complete Avive KYC Phase One
Fill the Form
step 2: Copy your OKX UID Number
To copy your OKX UID number, follow these simple steps:
On the web
Once you’re logged into your OKX account, go to the top right corner and click on the profile icon. After that, choose “overview.”
Under “My profile,” you’ll find your UID. You can copy your UID by clicking on the paper icon next to your ID.
On the mobile app
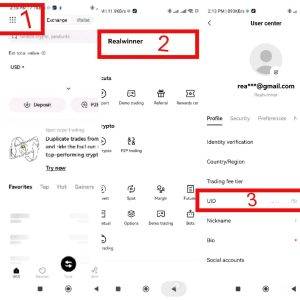
1. open the app and tap the three lines in the top left corner.
2. Select “Settings”
3. then tap on “Profile.”
4. Your UID will be displayed on this screen. To copy it, just tap on the icon next to it.

For more detailed instructions, you can refer to the OKX help center on how to locate your user ID (UID).
step 3:input your OKX UID on your avive app
To input your OKX UID on your Avive mining app, follow these simple steps:
1. Open your Avive mining app on your mobile device.
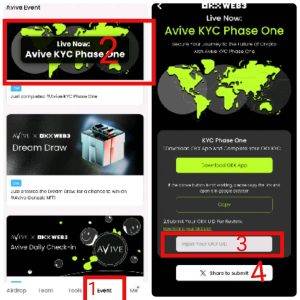
2. Tap on the “Event” tab located at the bottom of the screen.
3. click on “LIVE NOW: AVIVE KYC PHASE ONE”
4. Scroll down until you see an empty box labeled ” INPUT YOUR OKX UID.”
5. enter your OKX UID that you copied earlier from your OKX account.
6. Once you have entered your OKX UID, double-check to ensure accuracy.
7. Finally, tap on the “Share to submit” button to submit your OKX UID for verification.

By completing these steps, you have successfully inputted your OKX UID on your Avive mining app, and your Avive KYC Phase 1 verification is now complete. Congratulations! Now, all you have to do is wait for KYC Phase 2, which will be coming soon. Stay tuned for further instructions on how to proceed with the next phase of the verification process.
Remember, it is important to accurately input your OKX UID to ensure a smooth and successful verification process. Double-checking your UID before submitting it will help avoid any delays or issues.
For more crypto updates join our WhatsApp channels here
conclusion
To conclude, completing your Avive KYC Verification Phase 1 is a straightforward process that requires a few simple steps. By following the instructions provided in this article, you can ensure a smooth and successful verification experience.
First, you need to register an OKX exchange account. This will provide you with the necessary credentials to proceed with the verification process. Once you have your OKX UID number, you can move on to the next step.
The next step is to copy your OKX UID number. This unique identifier is essential for linking your OKX account with the Avive mining app. Make sure to accurately copy the UID to avoid any delays or issues during the verification process.
Finally, you need to input your OKX UID on your Avive mining app. Open the app, navigate to the “Event” tab, and locate the empty box labeled “UID.” Enter your OKX UID and double-check for accuracy. Once you are confident in the information provided, submit your OKX UID for verification by tapping the “Share” button.
By completing these steps, you have successfully finished your Avive KYC Verification Phase 1. Congratulations! Stay tuned for further instructions on how to proceed with Phase 2. Remember, accuracy and attention to detail are crucial throughout the verification process.
In the next phase, you will be required to provide additional information and documentation to complete the verification process. Keep an eye out for updates and follow the instructions provided by Avive to ensure a successful outcome.
Discover more from Realwinner Tips
Subscribe to get the latest posts sent to your email.
I’m trying to do my kyc buh if I click the kyc it’s not given me any options to click. Like I cannot click anything on it. And I have my okx and stuff all ready.
try update to latest version, if it doesn’t work clear your app cache